
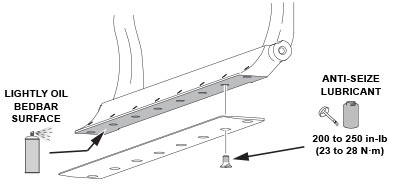
Figure 1.
IMPORTANT: Do not use an impact wrench to tighten the bedknife screws
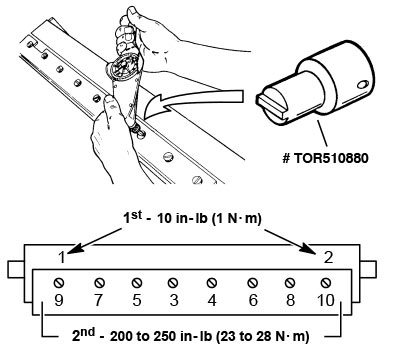
Figure 2.
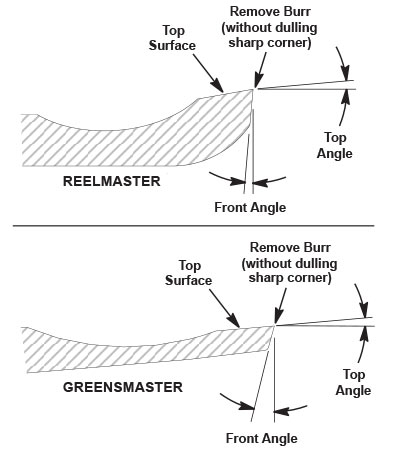
Figure 3.
Since there can be variations in the mounting surface of the bedbar, it is necessary to grind the bedknife after installing it to the bedbar. Follow the bedknife grinding specifications provided. Bedknives Reference Chart (See Fig. 3)
When grinding the bedknife, remove only enough material to make sure the top surface of the bedknife is true. Be careful not to overheat the bedknife. Remove small amounts of material with each pass of the grinder. Also, clean and dress grinding stone often during the grinding process.
Use Toro General Service Training Book, Reel Mower Basics (part no. 09168SL) and the grinder manufacturer’s instructions for additional bedknife grinding information.
NOTE: EdgeMax® bedknives are extremely hard. Using a diamond grinding wheel is recommended to prevent overheating or damaging the bedknife edge while grinding.
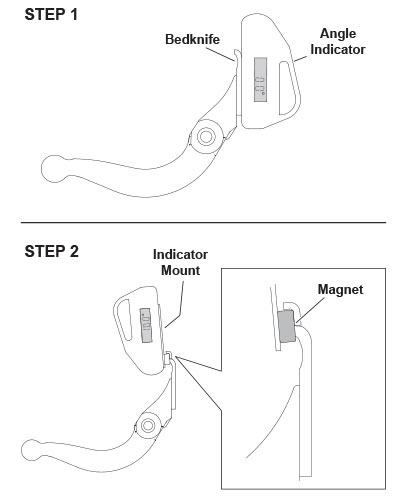
Figure 4.
Because the top grind angle on bedknives is critical for edge retention, and therefore after-cut appearance, Toro has develop special service tools for accurately measuring the top grind angle on all bedknives (Toro Special Tools 131-6828 and 131-6829). (See Fig. 4)
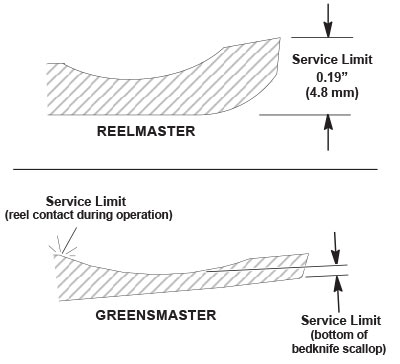
Figure 5.
IMPORTANT: Do not grind the bedknife below its service limit. Operating the cutting unit with the bedknife below the service limit may result in poor after-cut appearance and reduce the structural integrity of the bedknife for impacts. (See Fig. 5)
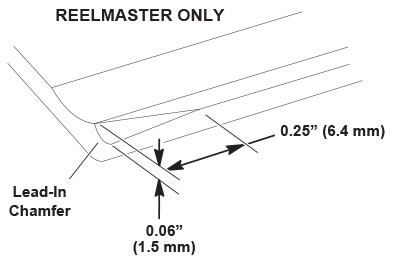
Figure 6.
A lead-in chamfer is ground into all new Reelmaster bedknives. The original chamfer should last for the first 40% of the bedknife service life. Check and re-grind the lead- in chamfer as necessary. (See Fig. 6)
Always adjust the cutting unit after grinding the reel and/or bedknife; refer to the Cutting Unit Operator’s Manual. To extend the cutting unit performance by allowing the reel and the bedknife to hold their edge longer, an additional adjustment may be required after the first few minutes of operation as the reel and bedknife conform to each other.
Make sure that all cutting unit components are in good condition. Depending on type of grinder used, faulty cutting unit components can affect grinding results. Check to make sure reel bearings are in good condition and properly adjusted before grinding the reel. Make sure the cutting unit frame and roller brackets are true, and not bent or damaged.
Remove the bedbar/bedknife assembly.
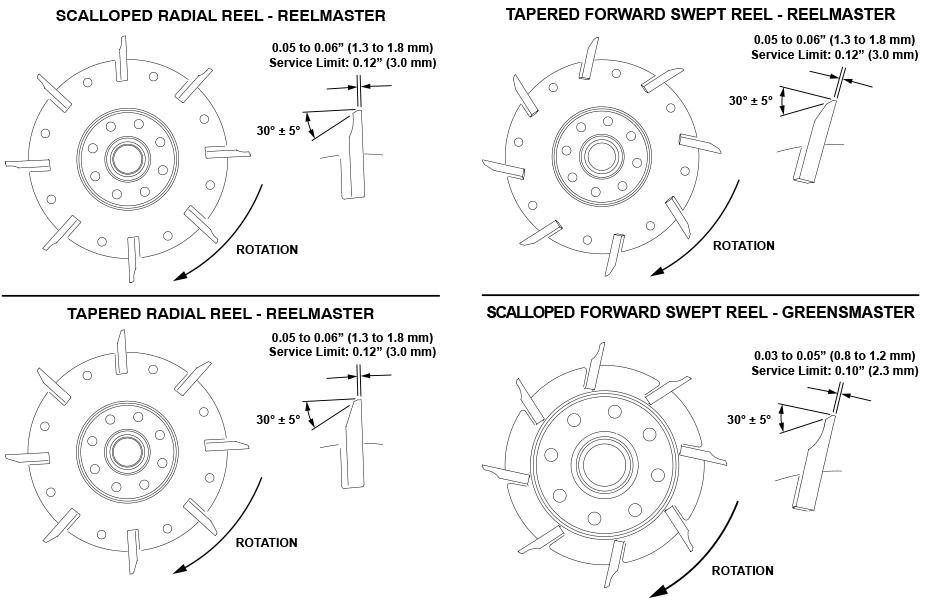
Figure 7.
Identify the type of reel to ensure that grinding is done correctly. There are four (4) different types of reels used on Toro products. The reels are defined by the type of blade relief (Scalloped or Tapered) and the placement of the blades (Radial or Forward Swept)(See Fig. 7)
NOTE: Greensmaster machines use Scalloped Forward Swept reels only.
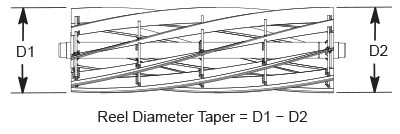
Figure 8.
Use a diameter/circumference measuring tape (Toro Special Tool TOR6023) to measure the reel diameter taper. (See Fig. 8)
IMPORTANT: Do not overheat the cutting reel blades while grinding. Remove small amounts of material with each pass of the grinder.
Relief grind the reel blades to the minimum blade land width if the reel blade land width exceeds the service limit. Toro recommends a 30 degree relief angle on each reel blade. You can vary the relief angle up to 5 degrees in either direction. A larger relief angle means you will have to grind the reel less often because the blade land width will increase at a slower rate as the reel wears. Unfortunately, a larger relief angle may make the reel blades more susceptible to damage from an impact. With a smaller relief angle, you may have to grind the reel more often to maintain the blade land width. A smaller relief angle will make the blade more resistant to damage from an impact.
Spin grind the reel to restore its cylindrical shape and to establish the specified blade land width after relief grinding.
Follow reel grinder manufacturer’s instructions to grind the cutting reel to Toro specifications. Reels Reference Chart. Reel grinding information can also be found in your Cutting Unit Operator’s Manual and the Toro Basics Series Training Book, Reel Mower Basics (part no. 09168SL) found on the Service Reference Set available from your Authorized Toro Distributor.
After grinding the reel and/or bedknife, adjust the cutting unit (see Cutting Unit Operator’s Manual). Check the reel to bedknife contact again after cutting two (2) fairways. During this initial use, any burrs will be removed from reel and bedknife which may create improper reel to bedknife clearance and thus accelerate wear. This practice of re−checking the reel to bedknife contact after grinding will extend the longevity of the sharpness of the edge of the reel and the bedknife.